{"variants":[{"id":47311584723287,"name":null,"title":"None \/ Black \/ Frame Only","option1":"None","option2":"Black","option3":"Frame Only","available":true,"inventory_policy":"continue","inventory_quantity":13,"limited_pre_order":false,"negative_stock_count":null,"price":215900,"compare_at_price":289900,"_karla_estimated_ship_date_start":null,"_karla_estimated_ship_date_end":null,"_container_id":null},{"id":47311584887127,"name":null,"title":"None \/ White \/ Frame Only","option1":"None","option2":"White","option3":"Frame Only","available":true,"inventory_policy":"continue","inventory_quantity":140,"limited_pre_order":false,"negative_stock_count":null,"price":215900,"compare_at_price":289900,"_karla_estimated_ship_date_start":null,"_karla_estimated_ship_date_end":null,"_container_id":null},{"id":50541195592023,"name":null,"title":"None \/ Grey \/ Frame Only","option1":"None","option2":"Grey","option3":"Frame Only","available":true,"inventory_policy":"continue","inventory_quantity":17,"limited_pre_order":false,"negative_stock_count":null,"price":215900,"compare_at_price":289900,"_karla_estimated_ship_date_start":null,"_karla_estimated_ship_date_end":null,"_container_id":null},{"id":40677505171499,"name":null,"title":"Black \/ Black \/ 120 x 60 cm","option1":"Black","option2":"Black","option3":"120 x 60 cm","available":true,"inventory_policy":"continue","inventory_quantity":13,"limited_pre_order":false,"negative_stock_count":null,"price":280900,"compare_at_price":370900,"_karla_estimated_ship_date_start":null,"_karla_estimated_ship_date_end":null,"_container_id":null},{"id":40265028468779,"name":null,"title":"Black \/ Black \/ 140 x 70 cm","option1":"Black","option2":"Black","option3":"140 x 70 cm","available":true,"inventory_policy":"continue","inventory_quantity":13,"limited_pre_order":false,"negative_stock_count":null,"price":337900,"compare_at_price":442900,"_karla_estimated_ship_date_start":null,"_karla_estimated_ship_date_end":null,"_container_id":null},{"id":40265028501547,"name":null,"title":"Black \/ Black \/ 160 x 80 cm","option1":"Black","option2":"Black","option3":"160 x 80 cm","available":true,"inventory_policy":"continue","inventory_quantity":13,"limited_pre_order":false,"negative_stock_count":null,"price":361900,"compare_at_price":480900,"_karla_estimated_ship_date_start":null,"_karla_estimated_ship_date_end":null,"_container_id":null},{"id":47245598064983,"name":null,"title":"Black \/ Black \/ 180 x 80 cm","option1":"Black","option2":"Black","option3":"180 x 80 cm","available":true,"inventory_policy":"continue","inventory_quantity":13,"limited_pre_order":false,"negative_stock_count":null,"price":398900,"compare_at_price":525900,"_karla_estimated_ship_date_start":null,"_karla_estimated_ship_date_end":null,"_container_id":null},{"id":50541195690327,"name":null,"title":"Black \/ Black \/ 200 x 80 cm","option1":"Black","option2":"Black","option3":"200 x 80 cm","available":true,"inventory_policy":"continue","inventory_quantity":13,"limited_pre_order":false,"negative_stock_count":null,"price":408900,"compare_at_price":543900,"_karla_estimated_ship_date_start":null,"_karla_estimated_ship_date_end":null,"_container_id":null},{"id":40677505204267,"name":null,"title":"Black \/ White \/ 120 x 60 cm","option1":"Black","option2":"White","option3":"120 x 60 cm","available":true,"inventory_policy":"continue","inventory_quantity":93,"limited_pre_order":false,"negative_stock_count":null,"price":280900,"compare_at_price":370900,"_karla_estimated_ship_date_start":null,"_karla_estimated_ship_date_end":null,"_container_id":null},{"id":40265028534315,"name":null,"title":"Black \/ White \/ 140 x 70 cm","option1":"Black","option2":"White","option3":"140 x 70 cm","available":true,"inventory_policy":"continue","inventory_quantity":140,"limited_pre_order":false,"negative_stock_count":null,"price":337900,"compare_at_price":442900,"_karla_estimated_ship_date_start":null,"_karla_estimated_ship_date_end":null,"_container_id":null},{"id":40265028567083,"name":null,"title":"Black \/ White \/ 160 x 80 cm","option1":"Black","option2":"White","option3":"160 x 80 cm","available":true,"inventory_policy":"continue","inventory_quantity":118,"limited_pre_order":false,"negative_stock_count":null,"price":361900,"compare_at_price":480900,"_karla_estimated_ship_date_start":null,"_karla_estimated_ship_date_end":null,"_container_id":"ler25019-c2"},{"id":47245598097751,"name":null,"title":"Black \/ White \/ 180 x 80 cm","option1":"Black","option2":"White","option3":"180 x 80 cm","available":true,"inventory_policy":"continue","inventory_quantity":106,"limited_pre_order":false,"negative_stock_count":null,"price":398900,"compare_at_price":525900,"_karla_estimated_ship_date_start":null,"_karla_estimated_ship_date_end":null,"_container_id":null},{"id":50541195723095,"name":null,"title":"Black \/ White \/ 200 x 80 cm","option1":"Black","option2":"White","option3":"200 x 80 cm","available":true,"inventory_policy":"continue","inventory_quantity":49,"limited_pre_order":false,"negative_stock_count":null,"price":408900,"compare_at_price":543900,"_karla_estimated_ship_date_start":null,"_karla_estimated_ship_date_end":null,"_container_id":null},{"id":50541195755863,"name":null,"title":"Black \/ Grey \/ 120 x 60 cm","option1":"Black","option2":"Grey","option3":"120 x 60 cm","available":true,"inventory_policy":"continue","inventory_quantity":17,"limited_pre_order":false,"negative_stock_count":null,"price":280900,"compare_at_price":370900,"_karla_estimated_ship_date_start":null,"_karla_estimated_ship_date_end":null,"_container_id":null},{"id":50541195854167,"name":null,"title":"Black \/ Grey \/ 140 x 70 cm","option1":"Black","option2":"Grey","option3":"140 x 70 cm","available":true,"inventory_policy":"continue","inventory_quantity":17,"limited_pre_order":false,"negative_stock_count":null,"price":337900,"compare_at_price":442900,"_karla_estimated_ship_date_start":null,"_karla_estimated_ship_date_end":null,"_container_id":null},{"id":50541195886935,"name":null,"title":"Black \/ Grey \/ 160 x 80 cm","option1":"Black","option2":"Grey","option3":"160 x 80 cm","available":true,"inventory_policy":"continue","inventory_quantity":17,"limited_pre_order":false,"negative_stock_count":null,"price":361900,"compare_at_price":480900,"_karla_estimated_ship_date_start":null,"_karla_estimated_ship_date_end":null,"_container_id":null},{"id":50541195919703,"name":null,"title":"Black \/ Grey \/ 180 x 80 cm","option1":"Black","option2":"Grey","option3":"180 x 80 cm","available":true,"inventory_policy":"continue","inventory_quantity":17,"limited_pre_order":false,"negative_stock_count":null,"price":398900,"compare_at_price":525900,"_karla_estimated_ship_date_start":null,"_karla_estimated_ship_date_end":null,"_container_id":null},{"id":50541195952471,"name":null,"title":"Black \/ Grey \/ 200 x 80 cm","option1":"Black","option2":"Grey","option3":"200 x 80 cm","available":true,"inventory_policy":"continue","inventory_quantity":17,"limited_pre_order":false,"negative_stock_count":null,"price":408900,"compare_at_price":543900,"_karla_estimated_ship_date_start":null,"_karla_estimated_ship_date_end":null,"_container_id":"ler25019-c2"},{"id":40677505302571,"name":null,"title":"Walnut \/ Black \/ 120 x 60 cm","option1":"Walnut","option2":"Black","option3":"120 x 60 cm","available":true,"inventory_policy":"continue","inventory_quantity":-1,"limited_pre_order":false,"negative_stock_count":null,"price":280900,"compare_at_price":370900,"_karla_estimated_ship_date_start":null,"_karla_estimated_ship_date_end":null,"_container_id":null},{"id":40265028763691,"name":null,"title":"Walnut \/ Black \/ 140 x 70 cm","option1":"Walnut","option2":"Black","option3":"140 x 70 cm","available":true,"inventory_policy":"continue","inventory_quantity":13,"limited_pre_order":false,"negative_stock_count":null,"price":337900,"compare_at_price":442900,"_karla_estimated_ship_date_start":null,"_karla_estimated_ship_date_end":null,"_container_id":null},{"id":40583409401899,"name":null,"title":"Walnut \/ Black \/ 160 x 80 cm","option1":"Walnut","option2":"Black","option3":"160 x 80 cm","available":true,"inventory_policy":"continue","inventory_quantity":13,"limited_pre_order":false,"negative_stock_count":null,"price":361900,"compare_at_price":480900,"_karla_estimated_ship_date_start":null,"_karla_estimated_ship_date_end":null,"_container_id":null},{"id":47245598130519,"name":null,"title":"Walnut \/ Black \/ 180 x 80 cm","option1":"Walnut","option2":"Black","option3":"180 x 80 cm","available":true,"inventory_policy":"continue","inventory_quantity":13,"limited_pre_order":false,"negative_stock_count":null,"price":398900,"compare_at_price":525900,"_karla_estimated_ship_date_start":null,"_karla_estimated_ship_date_end":null,"_container_id":"ler25019-c2"},{"id":50541195985239,"name":null,"title":"Walnut \/ Black \/ 200 x 80 cm","option1":"Walnut","option2":"Black","option3":"200 x 80 cm","available":true,"inventory_policy":"continue","inventory_quantity":13,"limited_pre_order":false,"negative_stock_count":null,"price":408900,"compare_at_price":543900,"_karla_estimated_ship_date_start":null,"_karla_estimated_ship_date_end":null,"_container_id":null},{"id":40677505335339,"name":null,"title":"Walnut \/ White \/ 120 x 60 cm","option1":"Walnut","option2":"White","option3":"120 x 60 cm","available":true,"inventory_policy":"continue","inventory_quantity":-1,"limited_pre_order":false,"negative_stock_count":null,"price":280900,"compare_at_price":370900,"_karla_estimated_ship_date_start":null,"_karla_estimated_ship_date_end":null,"_container_id":null},{"id":40265028829227,"name":null,"title":"Walnut \/ White \/ 140 x 70 cm","option1":"Walnut","option2":"White","option3":"140 x 70 cm","available":true,"inventory_policy":"continue","inventory_quantity":115,"limited_pre_order":false,"negative_stock_count":null,"price":337900,"compare_at_price":442900,"_karla_estimated_ship_date_start":null,"_karla_estimated_ship_date_end":null,"_container_id":null},{"id":40583410122795,"name":null,"title":"Walnut \/ White \/ 160 x 80 cm","option1":"Walnut","option2":"White","option3":"160 x 80 cm","available":true,"inventory_policy":"continue","inventory_quantity":47,"limited_pre_order":false,"negative_stock_count":null,"price":361900,"compare_at_price":480900,"_karla_estimated_ship_date_start":null,"_karla_estimated_ship_date_end":null,"_container_id":null},{"id":47245598163287,"name":null,"title":"Walnut \/ White \/ 180 x 80 cm","option1":"Walnut","option2":"White","option3":"180 x 80 cm","available":true,"inventory_policy":"continue","inventory_quantity":56,"limited_pre_order":false,"negative_stock_count":null,"price":398900,"compare_at_price":525900,"_karla_estimated_ship_date_start":null,"_karla_estimated_ship_date_end":null,"_container_id":"ler25019-c2"},{"id":50541196018007,"name":null,"title":"Walnut \/ White \/ 200 x 80 cm","option1":"Walnut","option2":"White","option3":"200 x 80 cm","available":true,"inventory_policy":"continue","inventory_quantity":37,"limited_pre_order":false,"negative_stock_count":null,"price":408900,"compare_at_price":543900,"_karla_estimated_ship_date_start":null,"_karla_estimated_ship_date_end":null,"_container_id":null},{"id":50541196050775,"name":null,"title":"Walnut \/ Grey \/ 120 x 60 cm","option1":"Walnut","option2":"Grey","option3":"120 x 60 cm","available":true,"inventory_policy":"continue","inventory_quantity":-1,"limited_pre_order":false,"negative_stock_count":null,"price":280900,"compare_at_price":370900,"_karla_estimated_ship_date_start":null,"_karla_estimated_ship_date_end":null,"_container_id":null},{"id":50541196149079,"name":null,"title":"Walnut \/ Grey \/ 140 x 70 cm","option1":"Walnut","option2":"Grey","option3":"140 x 70 cm","available":true,"inventory_policy":"continue","inventory_quantity":17,"limited_pre_order":false,"negative_stock_count":null,"price":337900,"compare_at_price":442900,"_karla_estimated_ship_date_start":null,"_karla_estimated_ship_date_end":null,"_container_id":null},{"id":50541196181847,"name":null,"title":"Walnut \/ Grey \/ 160 x 80 cm","option1":"Walnut","option2":"Grey","option3":"160 x 80 cm","available":true,"inventory_policy":"continue","inventory_quantity":17,"limited_pre_order":false,"negative_stock_count":null,"price":361900,"compare_at_price":480900,"_karla_estimated_ship_date_start":null,"_karla_estimated_ship_date_end":null,"_container_id":null},{"id":50541196214615,"name":null,"title":"Walnut \/ Grey \/ 180 x 80 cm","option1":"Walnut","option2":"Grey","option3":"180 x 80 cm","available":true,"inventory_policy":"continue","inventory_quantity":17,"limited_pre_order":false,"negative_stock_count":null,"price":398900,"compare_at_price":525900,"_karla_estimated_ship_date_start":null,"_karla_estimated_ship_date_end":null,"_container_id":"ler25019-c2"},{"id":50541196312919,"name":null,"title":"Walnut \/ Grey \/ 200 x 80 cm","option1":"Walnut","option2":"Grey","option3":"200 x 80 cm","available":true,"inventory_policy":"continue","inventory_quantity":17,"limited_pre_order":false,"negative_stock_count":null,"price":408900,"compare_at_price":543900,"_karla_estimated_ship_date_start":null,"_karla_estimated_ship_date_end":null,"_container_id":null},{"id":40677505237035,"name":null,"title":"White \/ Black \/ 120 x 60 cm","option1":"White","option2":"Black","option3":"120 x 60 cm","available":true,"inventory_policy":"continue","inventory_quantity":8,"limited_pre_order":false,"negative_stock_count":null,"price":280900,"compare_at_price":370900,"_karla_estimated_ship_date_start":null,"_karla_estimated_ship_date_end":null,"_container_id":null},{"id":40265028599851,"name":null,"title":"White \/ Black \/ 140 x 70 cm","option1":"White","option2":"Black","option3":"140 x 70 cm","available":true,"inventory_policy":"continue","inventory_quantity":13,"limited_pre_order":false,"negative_stock_count":null,"price":337900,"compare_at_price":442900,"_karla_estimated_ship_date_start":null,"_karla_estimated_ship_date_end":null,"_container_id":null},{"id":40265028632619,"name":null,"title":"White \/ Black \/ 160 x 80 cm","option1":"White","option2":"Black","option3":"160 x 80 cm","available":true,"inventory_policy":"continue","inventory_quantity":12,"limited_pre_order":false,"negative_stock_count":null,"price":361900,"compare_at_price":480900,"_karla_estimated_ship_date_start":null,"_karla_estimated_ship_date_end":null,"_container_id":null},{"id":47245598196055,"name":null,"title":"White \/ Black \/ 180 x 80 cm","option1":"White","option2":"Black","option3":"180 x 80 cm","available":true,"inventory_policy":"continue","inventory_quantity":13,"limited_pre_order":false,"negative_stock_count":null,"price":398900,"compare_at_price":525900,"_karla_estimated_ship_date_start":null,"_karla_estimated_ship_date_end":null,"_container_id":null},{"id":50541196345687,"name":null,"title":"White \/ Black \/ 200 x 80 cm","option1":"White","option2":"Black","option3":"200 x 80 cm","available":true,"inventory_policy":"continue","inventory_quantity":13,"limited_pre_order":false,"negative_stock_count":null,"price":408900,"compare_at_price":543900,"_karla_estimated_ship_date_start":null,"_karla_estimated_ship_date_end":null,"_container_id":null},{"id":40677505269803,"name":null,"title":"White \/ White \/ 120 x 60 cm","option1":"White","option2":"White","option3":"120 x 60 cm","available":true,"inventory_policy":"continue","inventory_quantity":8,"limited_pre_order":false,"negative_stock_count":null,"price":280900,"compare_at_price":370900,"_karla_estimated_ship_date_start":null,"_karla_estimated_ship_date_end":null,"_container_id":null},{"id":40265028665387,"name":null,"title":"White \/ White \/ 140 x 70 cm","option1":"White","option2":"White","option3":"140 x 70 cm","available":true,"inventory_policy":"continue","inventory_quantity":60,"limited_pre_order":false,"negative_stock_count":null,"price":337900,"compare_at_price":442900,"_karla_estimated_ship_date_start":null,"_karla_estimated_ship_date_end":null,"_container_id":null},{"id":40265028730923,"name":null,"title":"White \/ White \/ 160 x 80 cm","option1":"White","option2":"White","option3":"160 x 80 cm","available":true,"inventory_policy":"continue","inventory_quantity":12,"limited_pre_order":false,"negative_stock_count":null,"price":361900,"compare_at_price":480900,"_karla_estimated_ship_date_start":null,"_karla_estimated_ship_date_end":null,"_container_id":null},{"id":47245598228823,"name":null,"title":"White \/ White \/ 180 x 80 cm","option1":"White","option2":"White","option3":"180 x 80 cm","available":true,"inventory_policy":"continue","inventory_quantity":88,"limited_pre_order":false,"negative_stock_count":null,"price":398900,"compare_at_price":525900,"_karla_estimated_ship_date_start":null,"_karla_estimated_ship_date_end":null,"_container_id":null},{"id":50541196378455,"name":null,"title":"White \/ White \/ 200 x 80 cm","option1":"White","option2":"White","option3":"200 x 80 cm","available":true,"inventory_policy":"continue","inventory_quantity":42,"limited_pre_order":false,"negative_stock_count":null,"price":408900,"compare_at_price":543900,"_karla_estimated_ship_date_start":null,"_karla_estimated_ship_date_end":null,"_container_id":null},{"id":50541196411223,"name":null,"title":"White \/ Grey \/ 120 x 60 cm","option1":"White","option2":"Grey","option3":"120 x 60 cm","available":true,"inventory_policy":"continue","inventory_quantity":8,"limited_pre_order":false,"negative_stock_count":null,"price":280900,"compare_at_price":370900,"_karla_estimated_ship_date_start":null,"_karla_estimated_ship_date_end":null,"_container_id":null},{"id":50541196443991,"name":null,"title":"White \/ Grey \/ 140 x 70 cm","option1":"White","option2":"Grey","option3":"140 x 70 cm","available":true,"inventory_policy":"continue","inventory_quantity":17,"limited_pre_order":false,"negative_stock_count":null,"price":337900,"compare_at_price":442900,"_karla_estimated_ship_date_start":null,"_karla_estimated_ship_date_end":null,"_container_id":null},{"id":50541196476759,"name":null,"title":"White \/ Grey \/ 160 x 80 cm","option1":"White","option2":"Grey","option3":"160 x 80 cm","available":true,"inventory_policy":"continue","inventory_quantity":12,"limited_pre_order":false,"negative_stock_count":null,"price":361900,"compare_at_price":480900,"_karla_estimated_ship_date_start":null,"_karla_estimated_ship_date_end":null,"_container_id":"ler25019-c2"},{"id":50541196509527,"name":null,"title":"White \/ Grey \/ 180 x 80 cm","option1":"White","option2":"Grey","option3":"180 x 80 cm","available":true,"inventory_policy":"continue","inventory_quantity":17,"limited_pre_order":false,"negative_stock_count":null,"price":398900,"compare_at_price":525900,"_karla_estimated_ship_date_start":null,"_karla_estimated_ship_date_end":null,"_container_id":null},{"id":50541196542295,"name":null,"title":"White \/ Grey \/ 200 x 80 cm","option1":"White","option2":"Grey","option3":"200 x 80 cm","available":true,"inventory_policy":"continue","inventory_quantity":17,"limited_pre_order":false,"negative_stock_count":null,"price":408900,"compare_at_price":543900,"_karla_estimated_ship_date_start":null,"_karla_estimated_ship_date_end":null,"_container_id":null}]}
{"variants":[{"id":47311370420567,"name":null,"title":"None \/ Black \/ Frame Only","option1":"None","option2":"Black","option3":"Frame Only","available":true,"inventory_policy":"continue","inventory_quantity":-25,"limited_pre_order":false,"negative_stock_count":null,"price":162900,"compare_at_price":222900,"_karla_estimated_ship_date_start":null,"_karla_estimated_ship_date_end":null,"_container_id":null},{"id":50541119537495,"name":null,"title":"None \/ White \/ Frame Only","option1":"None","option2":"White","option3":"Frame Only","available":true,"inventory_policy":"continue","inventory_quantity":3,"limited_pre_order":false,"negative_stock_count":null,"price":162900,"compare_at_price":222900,"_karla_estimated_ship_date_start":null,"_karla_estimated_ship_date_end":null,"_container_id":null},{"id":50541119570263,"name":null,"title":"None \/ Grey \/ Frame Only","option1":"None","option2":"Grey","option3":"Frame Only","available":true,"inventory_policy":"continue","inventory_quantity":43,"limited_pre_order":false,"negative_stock_count":null,"price":162900,"compare_at_price":222900,"_karla_estimated_ship_date_start":null,"_karla_estimated_ship_date_end":null,"_container_id":null},{"id":50541119603031,"name":null,"title":"Black \/ Black \/ 120 x 60 cm","option1":"Black","option2":"Black","option3":"120 x 60 cm","available":true,"inventory_policy":"continue","inventory_quantity":-25,"limited_pre_order":false,"negative_stock_count":null,"price":228900,"compare_at_price":302900,"_karla_estimated_ship_date_start":null,"_karla_estimated_ship_date_end":null,"_container_id":null},{"id":50541119635799,"name":null,"title":"Black \/ Black \/ 140 x 70 cm","option1":"Black","option2":"Black","option3":"140 x 70 cm","available":true,"inventory_policy":"continue","inventory_quantity":-25,"limited_pre_order":false,"negative_stock_count":null,"price":285900,"compare_at_price":360900,"_karla_estimated_ship_date_start":null,"_karla_estimated_ship_date_end":null,"_container_id":null},{"id":50541119668567,"name":null,"title":"Black \/ Black \/ 160 x 80 cm","option1":"Black","option2":"Black","option3":"160 x 80 cm","available":true,"inventory_policy":"continue","inventory_quantity":-25,"limited_pre_order":false,"negative_stock_count":null,"price":308900,"compare_at_price":383900,"_karla_estimated_ship_date_start":null,"_karla_estimated_ship_date_end":null,"_container_id":null},{"id":52162633171287,"name":null,"title":"Black \/ Black \/ 180 x 80 cm","option1":"Black","option2":"Black","option3":"180 x 80 cm","available":true,"inventory_policy":"continue","inventory_quantity":-25,"limited_pre_order":false,"negative_stock_count":null,"price":346900,"compare_at_price":420900,"_karla_estimated_ship_date_start":null,"_karla_estimated_ship_date_end":null,"_container_id":null},{"id":50541119701335,"name":null,"title":"Black \/ White \/ 120 x 60 cm","option1":"Black","option2":"White","option3":"120 x 60 cm","available":true,"inventory_policy":"continue","inventory_quantity":3,"limited_pre_order":false,"negative_stock_count":null,"price":228900,"compare_at_price":302900,"_karla_estimated_ship_date_start":null,"_karla_estimated_ship_date_end":null,"_container_id":null},{"id":50541119734103,"name":null,"title":"Black \/ White \/ 140 x 70 cm","option1":"Black","option2":"White","option3":"140 x 70 cm","available":true,"inventory_policy":"continue","inventory_quantity":3,"limited_pre_order":false,"negative_stock_count":null,"price":285900,"compare_at_price":360900,"_karla_estimated_ship_date_start":null,"_karla_estimated_ship_date_end":null,"_container_id":null},{"id":50541119766871,"name":null,"title":"Black \/ White \/ 160 x 80 cm","option1":"Black","option2":"White","option3":"160 x 80 cm","available":true,"inventory_policy":"continue","inventory_quantity":3,"limited_pre_order":false,"negative_stock_count":null,"price":308900,"compare_at_price":383900,"_karla_estimated_ship_date_start":null,"_karla_estimated_ship_date_end":null,"_container_id":null},{"id":52162633204055,"name":null,"title":"Black \/ White \/ 180 x 80 cm","option1":"Black","option2":"White","option3":"180 x 80 cm","available":true,"inventory_policy":"continue","inventory_quantity":3,"limited_pre_order":false,"negative_stock_count":null,"price":346900,"compare_at_price":420900,"_karla_estimated_ship_date_start":null,"_karla_estimated_ship_date_end":null,"_container_id":null},{"id":50541119799639,"name":null,"title":"Black \/ Grey \/ 120 x 60 cm","option1":"Black","option2":"Grey","option3":"120 x 60 cm","available":true,"inventory_policy":"continue","inventory_quantity":43,"limited_pre_order":false,"negative_stock_count":null,"price":228900,"compare_at_price":302900,"_karla_estimated_ship_date_start":null,"_karla_estimated_ship_date_end":null,"_container_id":null},{"id":50541119832407,"name":null,"title":"Black \/ Grey \/ 140 x 70 cm","option1":"Black","option2":"Grey","option3":"140 x 70 cm","available":true,"inventory_policy":"continue","inventory_quantity":43,"limited_pre_order":false,"negative_stock_count":null,"price":285900,"compare_at_price":360900,"_karla_estimated_ship_date_start":null,"_karla_estimated_ship_date_end":null,"_container_id":null},{"id":50541119865175,"name":null,"title":"Black \/ Grey \/ 160 x 80 cm","option1":"Black","option2":"Grey","option3":"160 x 80 cm","available":true,"inventory_policy":"continue","inventory_quantity":43,"limited_pre_order":false,"negative_stock_count":null,"price":308900,"compare_at_price":383900,"_karla_estimated_ship_date_start":null,"_karla_estimated_ship_date_end":null,"_container_id":null},{"id":52162633236823,"name":null,"title":"Black \/ Grey \/ 180 x 80 cm","option1":"Black","option2":"Grey","option3":"180 x 80 cm","available":true,"inventory_policy":"continue","inventory_quantity":43,"limited_pre_order":false,"negative_stock_count":null,"price":346900,"compare_at_price":420900,"_karla_estimated_ship_date_start":null,"_karla_estimated_ship_date_end":null,"_container_id":null},{"id":50541119897943,"name":null,"title":"White \/ Black \/ 120 x 60 cm","option1":"White","option2":"Black","option3":"120 x 60 cm","available":true,"inventory_policy":"continue","inventory_quantity":-25,"limited_pre_order":false,"negative_stock_count":null,"price":228900,"compare_at_price":302900,"_karla_estimated_ship_date_start":null,"_karla_estimated_ship_date_end":null,"_container_id":null},{"id":50541119930711,"name":null,"title":"White \/ Black \/ 140 x 70 cm","option1":"White","option2":"Black","option3":"140 x 70 cm","available":true,"inventory_policy":"continue","inventory_quantity":-25,"limited_pre_order":false,"negative_stock_count":null,"price":285900,"compare_at_price":360900,"_karla_estimated_ship_date_start":null,"_karla_estimated_ship_date_end":null,"_container_id":null},{"id":50541119963479,"name":null,"title":"White \/ Black \/ 160 x 80 cm","option1":"White","option2":"Black","option3":"160 x 80 cm","available":true,"inventory_policy":"continue","inventory_quantity":-25,"limited_pre_order":false,"negative_stock_count":null,"price":308900,"compare_at_price":383900,"_karla_estimated_ship_date_start":null,"_karla_estimated_ship_date_end":null,"_container_id":null},{"id":52162633269591,"name":null,"title":"White \/ Black \/ 180 x 80 cm","option1":"White","option2":"Black","option3":"180 x 80 cm","available":true,"inventory_policy":"continue","inventory_quantity":-25,"limited_pre_order":false,"negative_stock_count":null,"price":346900,"compare_at_price":420900,"_karla_estimated_ship_date_start":null,"_karla_estimated_ship_date_end":null,"_container_id":null},{"id":50541119996247,"name":null,"title":"White \/ White \/ 120 x 60 cm","option1":"White","option2":"White","option3":"120 x 60 cm","available":true,"inventory_policy":"continue","inventory_quantity":3,"limited_pre_order":false,"negative_stock_count":null,"price":228900,"compare_at_price":302900,"_karla_estimated_ship_date_start":null,"_karla_estimated_ship_date_end":null,"_container_id":null},{"id":50541120029015,"name":null,"title":"White \/ White \/ 140 x 70 cm","option1":"White","option2":"White","option3":"140 x 70 cm","available":true,"inventory_policy":"continue","inventory_quantity":3,"limited_pre_order":false,"negative_stock_count":null,"price":285900,"compare_at_price":360900,"_karla_estimated_ship_date_start":null,"_karla_estimated_ship_date_end":null,"_container_id":null},{"id":50541120061783,"name":null,"title":"White \/ White \/ 160 x 80 cm","option1":"White","option2":"White","option3":"160 x 80 cm","available":true,"inventory_policy":"continue","inventory_quantity":3,"limited_pre_order":false,"negative_stock_count":null,"price":308900,"compare_at_price":383900,"_karla_estimated_ship_date_start":null,"_karla_estimated_ship_date_end":null,"_container_id":null},{"id":52162633302359,"name":null,"title":"White \/ White \/ 180 x 80 cm","option1":"White","option2":"White","option3":"180 x 80 cm","available":true,"inventory_policy":"continue","inventory_quantity":3,"limited_pre_order":false,"negative_stock_count":null,"price":346900,"compare_at_price":420900,"_karla_estimated_ship_date_start":null,"_karla_estimated_ship_date_end":null,"_container_id":null},{"id":50541120094551,"name":null,"title":"White \/ Grey \/ 120 x 60 cm","option1":"White","option2":"Grey","option3":"120 x 60 cm","available":true,"inventory_policy":"continue","inventory_quantity":8,"limited_pre_order":false,"negative_stock_count":null,"price":228900,"compare_at_price":302900,"_karla_estimated_ship_date_start":null,"_karla_estimated_ship_date_end":null,"_container_id":null},{"id":50541120127319,"name":null,"title":"White \/ Grey \/ 140 x 70 cm","option1":"White","option2":"Grey","option3":"140 x 70 cm","available":true,"inventory_policy":"continue","inventory_quantity":43,"limited_pre_order":false,"negative_stock_count":null,"price":285900,"compare_at_price":360900,"_karla_estimated_ship_date_start":null,"_karla_estimated_ship_date_end":null,"_container_id":null},{"id":50541120160087,"name":null,"title":"White \/ Grey \/ 160 x 80 cm","option1":"White","option2":"Grey","option3":"160 x 80 cm","available":true,"inventory_policy":"continue","inventory_quantity":12,"limited_pre_order":false,"negative_stock_count":null,"price":308900,"compare_at_price":383900,"_karla_estimated_ship_date_start":null,"_karla_estimated_ship_date_end":null,"_container_id":"ler25019-c2"},{"id":52162633335127,"name":null,"title":"White \/ Grey \/ 180 x 80 cm","option1":"White","option2":"Grey","option3":"180 x 80 cm","available":true,"inventory_policy":"continue","inventory_quantity":43,"limited_pre_order":false,"negative_stock_count":null,"price":346900,"compare_at_price":420900,"_karla_estimated_ship_date_start":null,"_karla_estimated_ship_date_end":null,"_container_id":null},{"id":50541120192855,"name":null,"title":"Walnut \/ Black \/ 120 x 60 cm","option1":"Walnut","option2":"Black","option3":"120 x 60 cm","available":true,"inventory_policy":"continue","inventory_quantity":-25,"limited_pre_order":false,"negative_stock_count":null,"price":228900,"compare_at_price":302900,"_karla_estimated_ship_date_start":null,"_karla_estimated_ship_date_end":null,"_container_id":null},{"id":50541120225623,"name":null,"title":"Walnut \/ Black \/ 140 x 70 cm","option1":"Walnut","option2":"Black","option3":"140 x 70 cm","available":true,"inventory_policy":"continue","inventory_quantity":-25,"limited_pre_order":false,"negative_stock_count":null,"price":285900,"compare_at_price":360900,"_karla_estimated_ship_date_start":null,"_karla_estimated_ship_date_end":null,"_container_id":null},{"id":50541120258391,"name":null,"title":"Walnut \/ Black \/ 160 x 80 cm","option1":"Walnut","option2":"Black","option3":"160 x 80 cm","available":true,"inventory_policy":"continue","inventory_quantity":-25,"limited_pre_order":false,"negative_stock_count":null,"price":308900,"compare_at_price":383900,"_karla_estimated_ship_date_start":null,"_karla_estimated_ship_date_end":null,"_container_id":null},{"id":52162633367895,"name":null,"title":"Walnut \/ Black \/ 180 x 80 cm","option1":"Walnut","option2":"Black","option3":"180 x 80 cm","available":true,"inventory_policy":"continue","inventory_quantity":-25,"limited_pre_order":false,"negative_stock_count":null,"price":346900,"compare_at_price":420900,"_karla_estimated_ship_date_start":null,"_karla_estimated_ship_date_end":null,"_container_id":"25019-c2"},{"id":50541120291159,"name":null,"title":"Walnut \/ White \/ 120 x 60 cm","option1":"Walnut","option2":"White","option3":"120 x 60 cm","available":true,"inventory_policy":"continue","inventory_quantity":-1,"limited_pre_order":false,"negative_stock_count":null,"price":228900,"compare_at_price":302900,"_karla_estimated_ship_date_start":null,"_karla_estimated_ship_date_end":null,"_container_id":null},{"id":50541120323927,"name":null,"title":"Walnut \/ White \/ 140 x 70 cm","option1":"Walnut","option2":"White","option3":"140 x 70 cm","available":true,"inventory_policy":"continue","inventory_quantity":3,"limited_pre_order":false,"negative_stock_count":null,"price":285900,"compare_at_price":360900,"_karla_estimated_ship_date_start":null,"_karla_estimated_ship_date_end":null,"_container_id":null},{"id":50541120356695,"name":null,"title":"Walnut \/ White \/ 160 x 80 cm","option1":"Walnut","option2":"White","option3":"160 x 80 cm","available":true,"inventory_policy":"continue","inventory_quantity":3,"limited_pre_order":false,"negative_stock_count":null,"price":308900,"compare_at_price":383900,"_karla_estimated_ship_date_start":null,"_karla_estimated_ship_date_end":null,"_container_id":null},{"id":52162633400663,"name":null,"title":"Walnut \/ White \/ 180 x 80 cm","option1":"Walnut","option2":"White","option3":"180 x 80 cm","available":true,"inventory_policy":"continue","inventory_quantity":3,"limited_pre_order":false,"negative_stock_count":null,"price":346900,"compare_at_price":420900,"_karla_estimated_ship_date_start":null,"_karla_estimated_ship_date_end":null,"_container_id":"learn25019-c2"},{"id":50541120389463,"name":null,"title":"Walnut \/ Grey \/ 120 x 60 cm","option1":"Walnut","option2":"Grey","option3":"120 x 60 cm","available":true,"inventory_policy":"continue","inventory_quantity":-1,"limited_pre_order":false,"negative_stock_count":null,"price":228900,"compare_at_price":302900,"_karla_estimated_ship_date_start":null,"_karla_estimated_ship_date_end":null,"_container_id":null},{"id":50541120422231,"name":null,"title":"Walnut \/ Grey \/ 140 x 70 cm","option1":"Walnut","option2":"Grey","option3":"140 x 70 cm","available":true,"inventory_policy":"continue","inventory_quantity":43,"limited_pre_order":false,"negative_stock_count":null,"price":285900,"compare_at_price":360900,"_karla_estimated_ship_date_start":null,"_karla_estimated_ship_date_end":null,"_container_id":null},{"id":50541120454999,"name":null,"title":"Walnut \/ Grey \/ 160 x 80 cm","option1":"Walnut","option2":"Grey","option3":"160 x 80 cm","available":true,"inventory_policy":"continue","inventory_quantity":43,"limited_pre_order":false,"negative_stock_count":null,"price":308900,"compare_at_price":383900,"_karla_estimated_ship_date_start":null,"_karla_estimated_ship_date_end":null,"_container_id":null},{"id":52162633433431,"name":null,"title":"Walnut \/ Grey \/ 180 x 80 cm","option1":"Walnut","option2":"Grey","option3":"180 x 80 cm","available":true,"inventory_policy":"continue","inventory_quantity":43,"limited_pre_order":false,"negative_stock_count":null,"price":346900,"compare_at_price":420900,"_karla_estimated_ship_date_start":null,"_karla_estimated_ship_date_end":null,"_container_id":"ler25019-c2"}]}
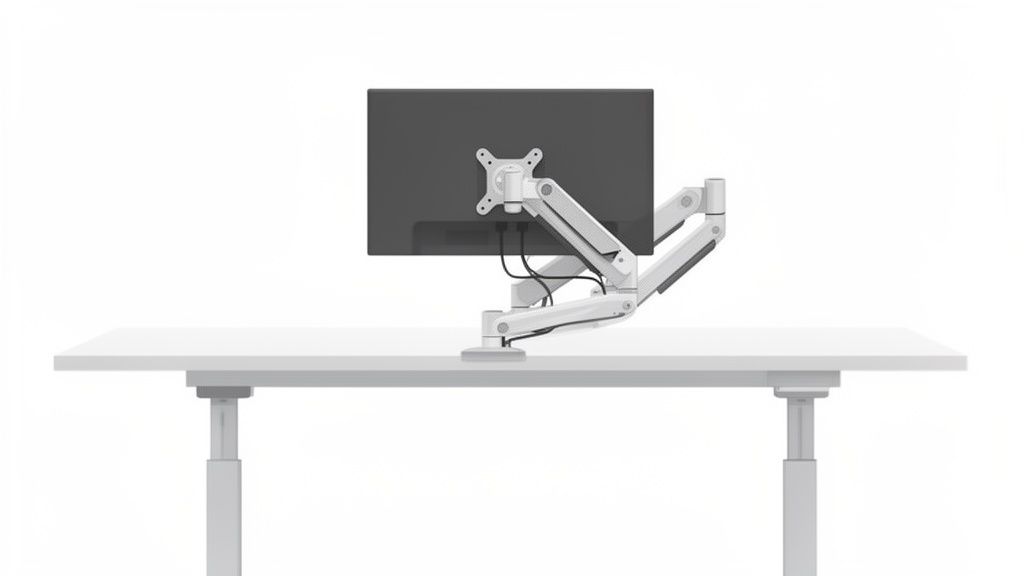
A VESA-standard monitor mount is a prerequisite for a flexible and ergonomic workstation. It is a universal standard that ensures monitor and monitor arm compatibility, regardless of the manufacturer. The main advantage is that you gain desk space and bring your screen to the correct eye level.
What a VESA mount means for your workstation
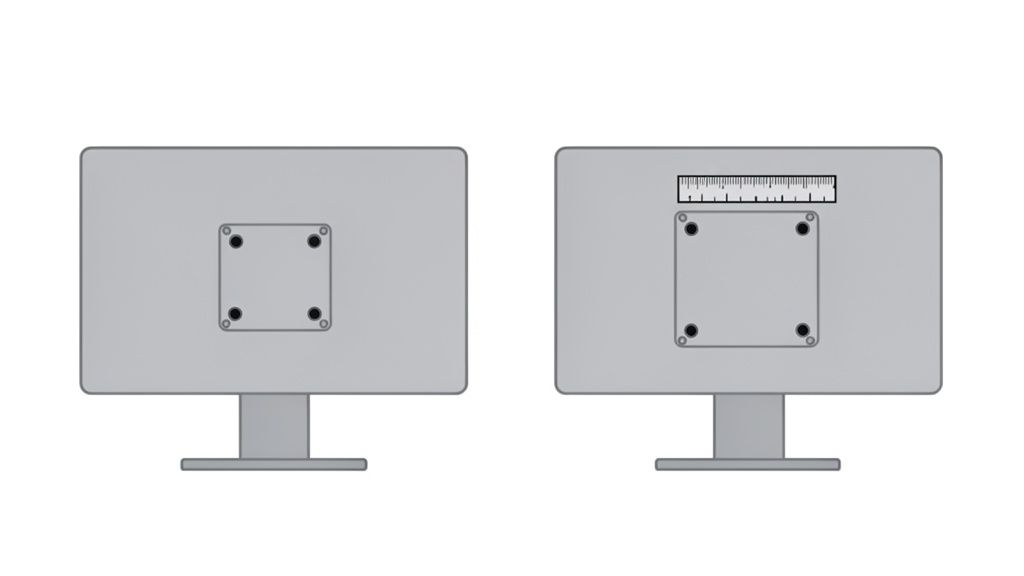
VESA is a common standard for monitors and mounts. The standard was developed by the Video Electronics Standards Association (VESA). It specifies clear guidelines for the spacing of the four screw holes on the back of your monitor.
This standard allows you to unscrew the stand and attach the monitor to a separate arm or wall mount instead. The result is a tidy and adaptable workstation.
The advantages at a glance
A VESA-compatible mount offers direct benefits in everyday work. It is an important component of an ergonomic workstation.
More desk space: Without the stand, you reclaim usable space.
Optimal ergonomics: You can adjust the height, tilt angle, and distance of your monitor to your sitting position. This helps prevent neck and back pain.
Flexible setup: A good monitor arm allows you to swivel or rotate the screen. This is useful if you want to show something to colleagues or switch to portrait mode for programming work.
Clean aesthetics: Many monitor arms have integrated cable management. The cables disappear into the arm of the mount, making your workstation look more professional.
The standardized hole patterns on the back of a monitor ensure this universal compatibility.
The most common dimensions are 75x75 mm or 100x100 mm. These standards ensure that mounts from different manufacturers fit your screen.
Why VESA is important today
The world of work is changing, making such standards indispensable. More and more people are working from home. A healthy and well-thought-out setup is becoming increasingly important there. There are many tips on how to optimize your home office workstation. A good monitor mount is part of that.
The market reflects this trend. Demand for monitor mounts is growing. Analysts estimate the market volume for TV wall mounts, a related area, to be around 12.50 billion US dollars in 2024. Growth to 22.70 billion US dollars is projected by 2032. These figures show the need for flexible screen solutions.
VESA standards explained simply
When you buy a monitor mount, you will encounter the term "VESA". The VESA standard is an agreement that ensures your monitor and mount are compatible, regardless of the manufacturer.
It concerns the four screw holes on the back of your screen. The number combinations, such as 75x75 or 100x100, indicate the distance between these holes in millimeters. A 75x75 VESA pattern means that the holes form a square with 75 mm sides. This standardization simplifies mounting.
Behind the system is the Video Electronics Standards Association (VESA), an association of (as of 2023) 340 member companies. They determine which hole patterns are suitable for which screen sizes and weight classes. Around 92% of all monitors today are VESA-compatible. Since over 12 million people will be working from home in Germany in 2025, this compatibility is important. If you want to learn more, you can find details at the Video Electronics Standards Association on Wikipedia.
The most common VESA patterns for monitors
For most workplaces, you only need to know a few numbers. In practice, two patterns cover almost all common monitors.
VESA MIS-D 75x75: You'll find this pattern on smaller monitors, typically up to 24 inches.
VESA MIS-D 100x100: This is the standard for most office monitors. Almost every screen between 24 and 32 inches uses this hole pattern.
Larger standards like 200x100 or 200x200 are intended for very heavy monitors or televisions and are rare in everyday office use.
Important note: Pay attention not only to the hole pattern but also to the weight of your monitor. Every VESA mount has a maximum load capacity that you should not exceed to ensure stability.
The following table provides an overview of which VESA size typically matches which monitor size and weight.
Overview of common VESA standards for monitors
VESA standard (hole spacing in mm)
Typical monitor size
Approximate maximum weight
75x75
Up to 24 inches
Up to 8 kg
100x100
24 to 32 inches
Up to 14 kg
200x100
Larger than 32 inches / Ultrawide
Up to 22 kg
200x200
Very large monitors / small TVs
Up to 35 kg
These values are guidelines to help you choose the right mount.
How to check your monitor's compatibility
Before buying a mount, check if your monitor fits. This can be done in two steps.
Look at the back: Check the back of your monitor. Most often, you'll see four screw holes arranged in a square. Sometimes they are hidden under a plastic cap or the stand needs to be unscrewed first.
Check the datasheet: If you are unsure, consult your monitor's technical datasheet. Search online for your model name plus "datasheet" or "specifications". The VESA standard will be listed there.
With this information, you will find the right monitor VESA mount for your device.
How to find the right monitor mount for you
Finding the right Monitor VESA Mount is easy if you know your requirements. Not every mount fits every desk or monitor.
Check the different types. Each has strengths, depending on how much flexibility you need at your workstation. The choice influences your ergonomics and how you use your desk.
Overview of different mount types
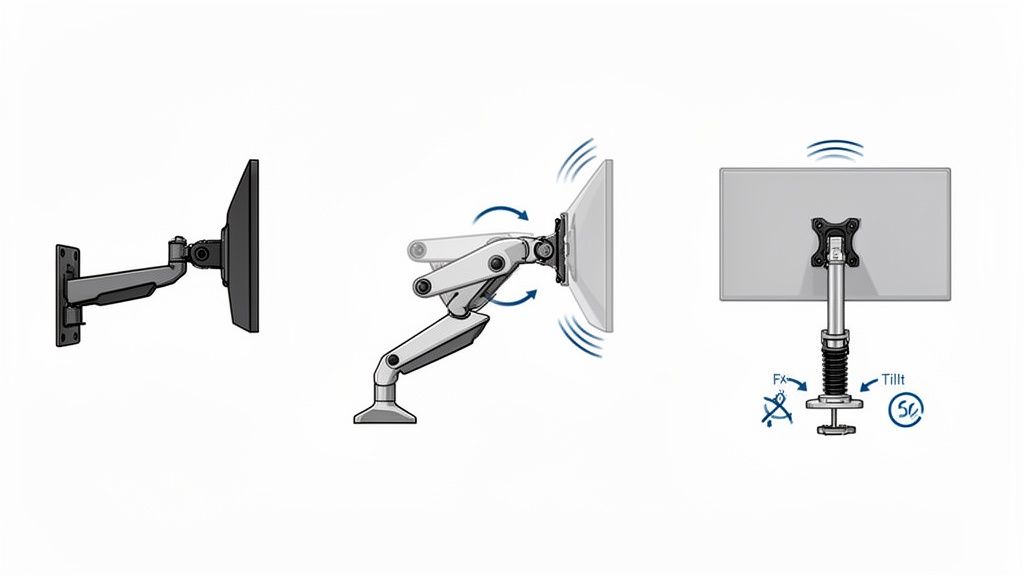
The most common models can be divided into three categories.
Static mounts: These are the simplest models. They hold the monitor in a fixed position. You adjust the height during installation. A solid and inexpensive solution for static workstations.
Swivelling monitor arms: These arms offer more freedom of movement. You can swivel the monitor sideways, tilt it, and often rotate it (pivot function). Ideal if you want to show your screen to a colleague or quickly switch from landscape to portrait mode.
Gas spring mounts: These are the most flexible solution. Thanks to the gas spring, you can effortlessly adjust the monitor's height continuously. The perfect choice for height-adjustable desks and switching between sitting and standing.
Which type is right depends on your daily work and your ergonomic goals.
Checklist for your decision
Check these three points to buy the right mount. They are crucial for compatibility and safety.
Weight and size of your monitor: Every mount is designed for a maximum load capacity and specific screen sizes. Do not exceed these values, otherwise stability is not guaranteed. You can find the weight of your monitor (without stand) in the technical datasheet.
VESA compatibility: Check the VESA hole pattern on the back of your monitor. The most common standards are 75x75 mm and 100x100 mm. Your mount must precisely match this pattern.
Your desired flexibility: Consider how often you want to change the position of your monitor. Is a fixed height sufficient, or do you need full freedom of movement? Your answer determines whether a static arm or a gas spring model is better. A detailed overview can also be found in our guide to Monitor Mounts for Desks.
An important factor for the stability of your monitor mount is your desktop. Make sure it is strong enough to withstand the pressure of the clamp. For most wooden, MDF, or composite desktops, a clamp attachment is ideal. Caution is advised with delicate materials like glass, as the pressure can cause damage.
The right Monitor VESA Mount is an investment in your health and productivity. With these criteria, you will find the model that suits you and your workstation.
Step-by-step to safe installation
Properly installing a Monitor VESA Mount is crucial for the stability of your setup. A clear procedure ensures that everything holds securely and functions optimally. We will go through the process together.
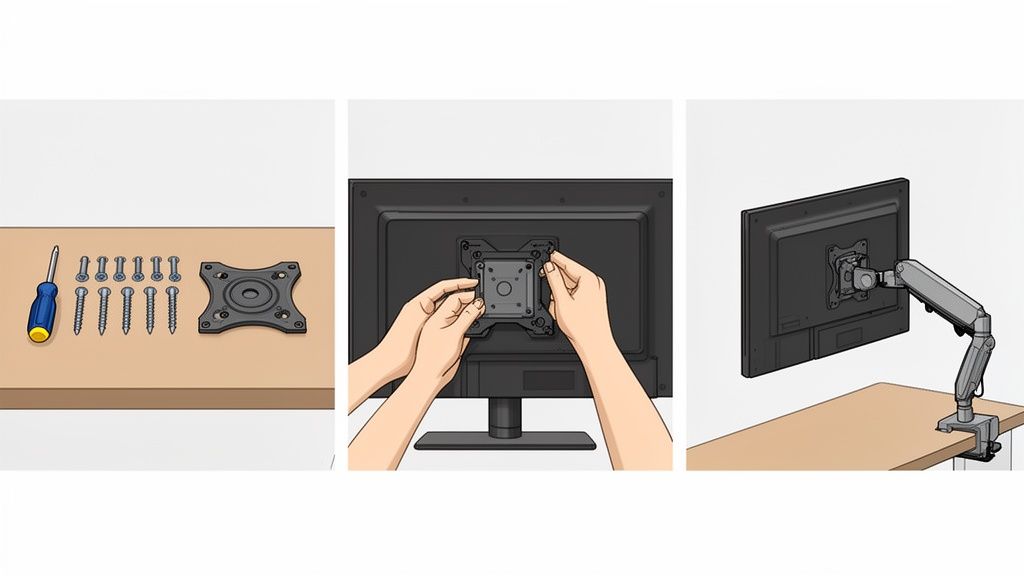
The installation is divided into four phases to avoid typical errors. Careful assembly is the foundation for a durable workstation.
Phase 1: Preparation and tool check
Before starting, lay out all parts and tools. Check the instructions to ensure all items are included.
Tools: A Phillips head screwdriver is usually sufficient. A suitable Allen key is often included.
Screws: Your mount will come with various VESA screw sets. Choose the right ones for your monitor.
Work surface: Place the monitor face down on a soft, clean surface to prevent scratches.
Good preparation saves time.
Phase 2: Attaching the mount to the desktop
Attach the main arm of the mount to the desk. Most models use a desk clamp.
Choose position: Select the position for the arm. Leave enough space from the wall to allow it to swivel freely.
Attach clamp: Place the clamp on the edge of the table and tighten the screw from below.
Check stability: Shake the arm vigorously. It must not move.
A stable base is essential for a secure monitor mount.
VESA standardization has improved mounting safety. Since the standard was introduced in 1997, mounting accidents have reportedly decreased by approximately 90 percent, according to industry reports. This shows the importance of following instructions.
Phase 3: Mounting the VESA plate to the monitor
Connect the VESA adapter plate to your monitor.
Remove stand: Unscrew the original stand from your monitor, if you haven't already.
Align plate: Place the VESA plate over the screw holes on the back of your monitor.
Tighten screws: Hand-tighten the four VESA screws. Then tighten them diagonally to distribute the pressure evenly.
Tighten the screws firmly, but not too tightly.
Phase 4: Hanging and adjusting the monitor
Hang the monitor on the arm and make the fine adjustments.
Insert monitor: Lift the monitor and place the mounted VESA plate into the receiver on the monitor arm. A second person can be helpful here.
Secure: Secure the monitor as described in the instructions. There is often an additional locking screw.
Cable management: Route the monitor cables through the channels in the mount. Allow enough slack for the cables, especially on a height-adjustable desk.
Fine adjustment: Adjust the gas spring to the weight of your monitor. This allows it to be adjusted effortlessly in height. Adjust the tilt and rotation to your liking.
In Germany, the VESA Part D, which supports monitors up to 14 kg, is found on approximately 80 percent of monitors sold. If you want to learn more, you can find further details of the VESA standards on cmb-systeme.de.
Combine monitor mount and height-adjustable desk
A height-adjustable desk is an important part of an ergonomic workstation. However, it only reaches its full potential with a flexible Monitor VESA Mount. This combination ensures that your ergonomics are correct in any position.
If you raise your desk but the monitor remains low, you tilt your head. This leads to an unhealthy posture. The monitor must move with the desk. Only then will your viewing angle and posture remain optimal.
Dynamic adjustment for a healthy posture
The best solution is a monitor arm with a gas spring. It allows you to adjust the height of your screen with a light movement. This way, the monitor follows the desk and stays at eye level.
This dynamic adjustment is crucial. It ensures that you take advantage of your sit-stand workstation and that your neck and back remain in a neutral position. The combination of both creates a setup that adapts to you.
A perfectly aligned monitor relieves the cervical spine. Studies show that correct screen height can reduce neck tension by up to 17%.
Cable management on height-adjustable desks
An often-forgotten point is cable management. Cables that are too short or poorly routed can get snagged or become detached when the desk is raised and lowered.
Plan enough slack for all cables from the outset. Here are some tips for a clean and secure setup:
Sufficient cable length: Ensure that all cables are long enough to reach the highest position of the desk.
Use integrated cable routing: Most good monitor arms have integrated channels or clips for routing cables.
Use flexible cable sleeves: A cable sleeve bundles all cables, protects them, and moves flexibly with the desk.
Cable ties and hook-and-loop fasteners: Use hook-and-loop fasteners to secure cables to the monitor arm or under the desktop. They are reusable and easy to handle.
Well-thought-out cable management is crucial for the safety and longevity of your setup. It prevents cable clutter and protects your devices. If you are looking for the right foundation for your setup, you will find the best height-adjustable desks in our guide.
VESA-FAQ: Answers to the most common questions
Here you will find answers to the most common questions about VESA mounts, monitors, and installation.
What do I do if my monitor doesn't have VESA holes?
Even if your monitor doesn't have VESA holes, you can use a monitor arm. The solution is a VESA adapter.
These adapters are adjustable clamps. They grip your monitor at the edges and provide a standardized VESA mounting plate on the back. You can attach any common monitor mount to this plate.
When buying, make sure the adapter fits your screen size and the thickness of your monitor frame.
How do I find out the weight of my monitor?
The exact weight of your monitor is important. Every mount has a maximum load capacity that should not be exceeded for safety reasons.
The easiest way to find the weight is in your monitor's technical datasheet. Search online for your model name along with "specifications" or "datasheet".
The crucial value is the "weight without stand". You remove the original stand before mounting.
If you cannot find the datasheet, unscrew the stand and place the monitor on a bathroom scale.
Can I attach a monitor mount to a glass tabletop?
We advise against it. A clamp mount exerts high localized pressure on the tabletop. With glass, this pressure can lead to tension that can damage the tabletop.
For desks with glass tops, there are alternatives:
Wall mounts: A secure solution if your desk is against a wall.
Mounts with drilling: Some mounts can be installed through an existing cable hole in the tabletop. This distributes the pressure better.
Freestanding mounts: These models have their own heavy base and stand directly on the desk.
For wooden, MDF, or composite tabletops, clamp mounting is unproblematic.
Is a dual monitor mount better than two single arms?
The decision between a dual mount and two single arms depends on your needs.
A dual mount only requires one attachment point on the desk. This saves space and is often cheaper. It is ideal for a tidy setup with two equally sized monitors.
Two single monitor arms offer maximum flexibility. You can adjust each monitor independently in height, depth, and angle. Ideal if you use monitors of different sizes, want to rotate one of them vertically, or often rearrange your setup.
Discover the right monitor mount and accessories to improve your workstation at Deskspace. Find the perfect solution for your ergonomic setup now at https://deskspace.de.